Newspaper theme is no doubt one of the best popular premium themes available for WordPress. Developed by tagDiv, a team of professional developers, they deliver the best user experience in the WordPress environment. Despite its premium quality, there’s always a thing called optimization. So here’s how to properly optimize Newspaper theme.
- Test you site for future reference
- Step-by-Step procedure on optimizing Newspaper theme and improve site loading speed
- Install a caching plugin.
- Use a CDN
- Cache everything with Cloudflare
- Optimize Static Files with CloudFlare
- Set Leverage Browser Caching – Add Expire Headers
- Optimize Images
- Disable Emojis
- Disable WordPress Embeds
- Preload Newspaper fonts
- Delay scripts until user interaction
- Optimize fonts on your website
- Self-host Google Analytics
- Host jQuery from Google
- Plugin Load Optimization (Clean unnecessary Assets)
- Conclusion
This theme is available for purchase from ThemeForest, a large platform or marketplace with thousands of premium products available. Newspaper Theme comes in one of the Top 10 WordPress Themes, currently positioned as no.3 (as of 2020-08-23) and is the #1 selling News Theme of all Time – Source: WPThemeDetector.
With Newspaper theme, you get Lifetime with professional support (via their Forum and E-Mail). Newspaper theme comes with some premium plugins. All the plugins are well-tested to work with the theme and the Newspaper team keeps them up to date. The theme comes packed with the following premium plugins:
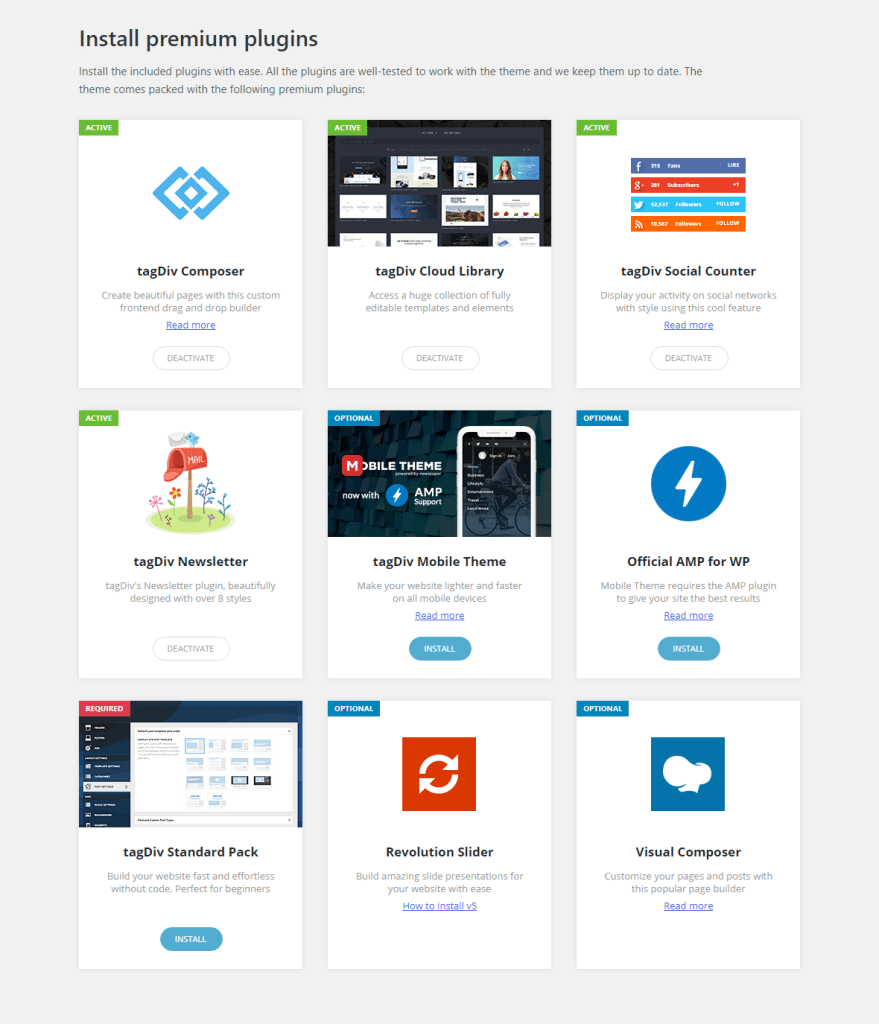
- tagDiv Composer – Create beautiful pages with this custom frontend drag and drop builder
- tagDiv Cloud Library – Access a huge collection of fully editable templates and elements
- tagDiv Social Counter – Display your activity on social networks with style using this cool feature
- tagDiv Newsletter– tagDiv’s Newsletter plugin, beautifully designed with over 8 styles
- tagDiv Mobile Theme – Make your website lighter and faster on all mobile devices
- Official AMP for WP – Mobile Theme requires the AMP plugin to give your site the best results
- tagDiv Standard Pack – Build your website fast and effortless without code. Perfect for beginners
- Revolution Slider – Build amazing slide presentations for your website with ease
- Visual Composer – Customize your pages and posts with this popular page builder
Newspaper theme offers outstanding support through their forum which has been established to become a great community. Newspaper theme also comes with properly written and well-explained documentation which gives you important information about the theme. Documentation is an exceptional resource to start discovering any theme’s true potential.
You are not left with just these. The easiest way to learn anything is by watching a video tutorial. Newspaper theme (tagDiv Team) has a growing library of narrated video tutorials to help you do just that.
Newspaper theme is also compatible with the following plugins. With each theme release, they provide a list of fully supported plugins. They manually inspect each plugin periodically.

Now before starting with the tutorial, I would like to share some more information. I have optimized the site and was tested on the following setup:
- Shared hosting with Apache Server
- Theme installed is Newspaper v10.3.6.1 by tagDiv (of course)
- WordPress v5.5 and PHP v7.4
Now, moving towards what we will be discussing today. These are some ideas that I came through and learned while optimizing my site. I am assuming you are on a self-Hosted WordPress with Newspaper theme installed and activated.
Test you site for future reference
Speed has been a ranking signal for ages. We suggest you test your sites first on GTMetrix, PageSpeed Insights, and Pingdom and save the test report (if possible). This will help you compare how your site got improved. We won’t be running for scores (It will improve as we perform optimizations) but we will mainly focus on improving load time and not scores and numbers.
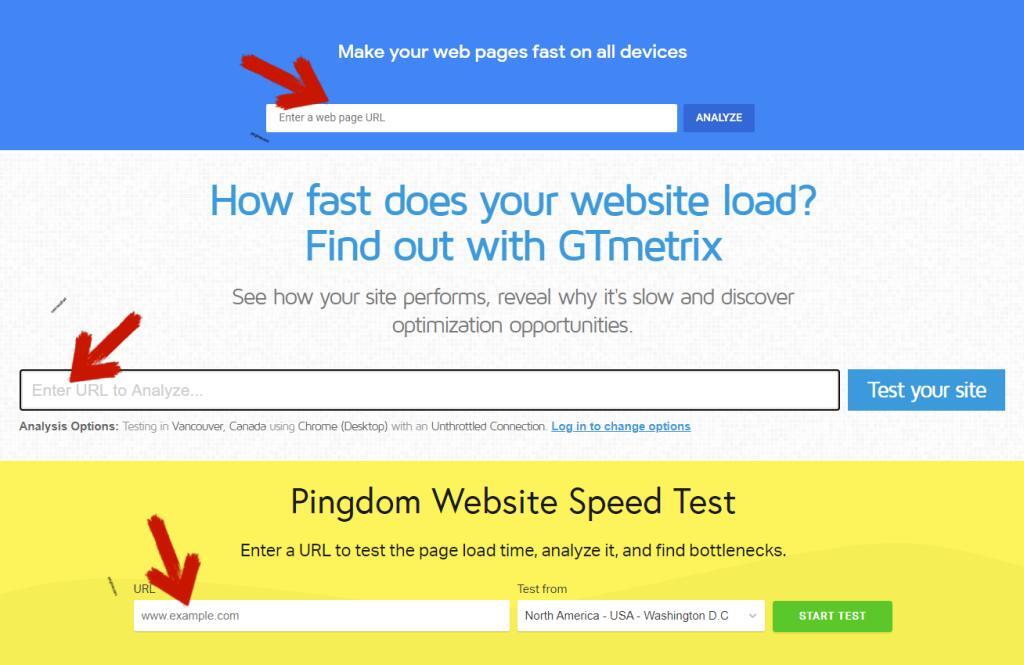
PageSpeed Insights scores may vary whenever they bring new metrics but our main focus here will be loading speed. Focus on FCP, LCP, TTI, CLS, etc. Don’t focus on fully loading time. Also while testing your site on GTMetrix or Pingdom or any site you use for testing your site, we suggest you to chose the nearest location to your hosting because geographical distance and latency also play an important role in a website’s speed. We will also be talking about using CDN which will help in low latency and build a good user experience.
With increasing page loading speed, we don’t actually mean to make the website take more time to load. It’s just a typo many people get confused or don’t know (Even big sites). With increasing page loading speed, we actually refer to improve the overall page load time. Take it as decreasing the seconds it takes to load a page rather than increasing that. We will be lowering down the seconds your website takes while loading. Obviously, you don’t want your site to take more time to load, do you?
Step-by-Step procedure on optimizing Newspaper theme and improve site loading speed
Install a caching plugin.
On this blog, we are using WP Rocket for overall optimizations (Minification, caching, and other optimizations) though WP Super Cache is the recommended and tested cache plugin by tagDiv. If you use WP Super Cache, you’ll need to use another plugin for optimization like Autoptimize.
If you are on a LiteSpeed web server, we suggest you use the LiteSpeed cache plugin (Developed by the LiteSpeed team) because it provides extended features the same as WP Rocket but is free (Unlike WP Rocket). This will also help you get a free CDN by Quic.cloud
List of speed recommendations by tagDiv:
- Use WP Super Cache with default settings.
- You may also use the APC full page cache if you have a lot of ram on your server.
Use a CDN
You are suggested to use a CDN if the visitors on your site come from across the Globe. If your audience is local you can freely ignore the use of CDN.
First, choose a CDN you will be using. In today’s guide, we will be using and talking about Cloudflare as it also provided free CDN. Cloudflare provides free DNS and CDN services. Cloudflare’s free CDN service is enough for sites that do not require extensive resources and features. With just the free CDN feature, you can cache all the resources on your website. Cloudflare caches your content across its global network bringing it closer to visitors from every region. Cloudflare’s free plan is suitable for personal websites, blogs, and anyone who wants to explore Cloudflare or just use their DNS service.
If you do not have a budget for a CDN you are suggested to use CloudFlare but be informed that Cloudflare does have routing issues that means all visitors may not always be served from the nearest location. This issue does not occur if you are on a Business or an Enterprise plan on Cloudflare.
Also if you are on a LiteSpeed server, you get to use the free CDN provided by Quic.cloud
Currently, Quic.cloud only works with WordPress and no other CMS. Quic.cloud is still in its beta stage and is not recommended for use in production environments.
An extensive and proper guide on configuring Cloudflare properly and make use of every single feature on the Free plan will come in near future. But for today’s tutorial, we will be applying and using few features which will help to optimize your site and improve loading speed.
Cache everything with Cloudflare
How will this help improve website speed? This will help improving website speed by lowering Time To First Byte (TTFB) to almost 50ms and loading websites assets via the nearest Data Center (DC). Cloudflare has 155+ DC’s maintained all around the world.
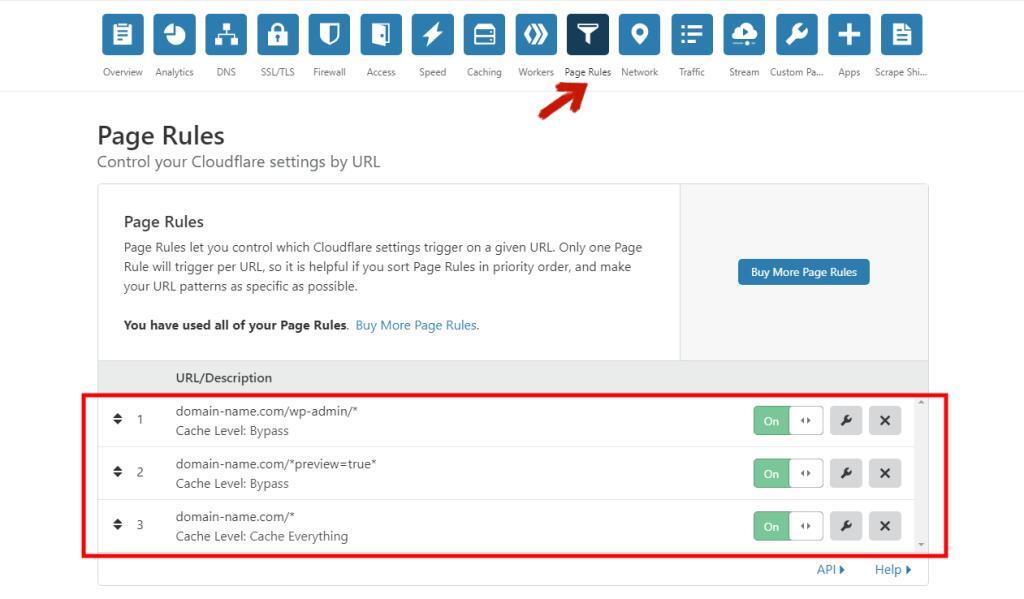
Cloudflare does not automatically cache HTML and dynamic assets by default. To cache contents with Cloudflare, a Page Rule is required that is set to Cache Everything. If we use Cache Everything Rule, we need to exclude WP Dash pages from caching and set a Bypass Rule. We can tell Cloudflare to Cache Everything in two ways. One is by doing it manually and the other is by using a plugin.
Cache everything with Cloudflare manually (Page Rules)
If we use the manual way, we have to use all three Page Rules for better results and minimize conflicts (Caching wp-admin URL)
Login to Cloudflare Dashboard >> Page Rules and add the following three Rules:
Set CloudFlare with Plugin
CloudFlare’s free plan allows you to enable page caching by applying the Cache Everything rule which greatly improves response time (Discussed above)
However, using the Cache Everything rule on dynamic websites such as WordPress is not possible without running into problems as it is not possible to exclude critical web pages from the cache. The sessions for logged-in users, ajax requests, and much more can also get cached. This is the reason we had to make use of all three-page rules to make sure we do not run into any problem of caching unwanted pages.
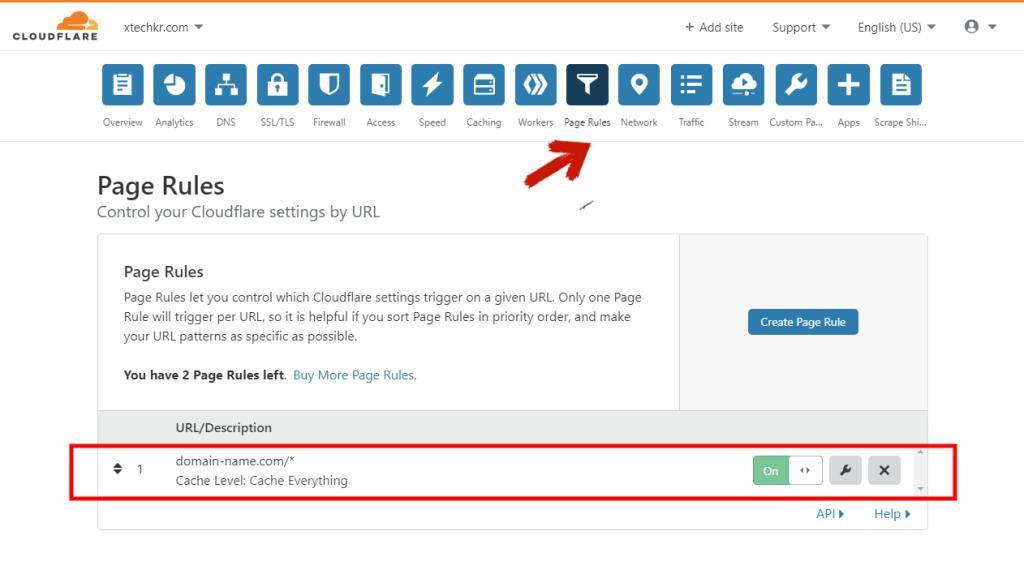
Thanks to the developer of WP Cloudflare Super Page Cache, we can improve the response time and load time of our WordPress website. This will help us take advantage of a very fast Cloudflare cache for HTML pages which will save a lot of bandwidth. With the help of this plugin, there is no need of purchasing higher plans on Cloudflare as it does the work of many Page Rules itself.

You can easily configure the plugin as the setup is quite friendly with steps and suggestions clearly written. You can use Cloudflare cache and serve pages from their Edge servers easily with just on Page Rule. The plugin adds the following Page Rule:
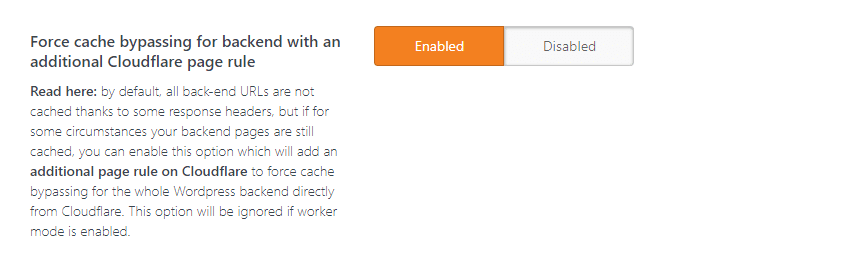
In the worst-case scenario, in case if your WP Dash also gets cached (which obviously should not happen), you can force a cache bypass for the backend with an additional Cloudflare page rule.
Read here: By default, all back-end URLs are not cached, thanks to some response headers, but if for some circumstances your backend pages are still cached, you can enable this option which will add an additional page rule on Cloudflare to force cache bypass for the whole WordPress backend directly from Cloudflare.
There is a different way of using Cloudflare as a page caching system instead of page rules. You can use Cloudflare Worker instead of Page Rule. This mode is only recommended if there are conflicts with the current web server or other plugins, as it is not 100% free.
Optimize Static Files with CloudFlare
Minify Assets with CloudFlare
Poorly written codes can slow your website, negatively affecting load times and rendering speed. Optimization is a special type of minification that will help you make your site light and fast.
Minifying CSS, HTML, and JavaScript can be done in two ways, manually and by using some WordPress plugins. It seems very hard when you go through the way of minifying CSS, HTML, and JavaScript manually. We will use some handy techniques to speed up our site’s speed. This will help you rank high in Google Page Speed Insights. This trick is really very convenient and you’ll love it.
What is Minifying?
Minification (also minimization or minimization) is the process of removing all unnecessary characters from the source code without changing its functionality. Minifying is the process of shortening the language codes like HTML, CSS, and JavaScript. While building up a site, they are made up of the combinations of PHP, HTML, CSS, and JavaScript which contains a lot of unnecessary scripts, codes, gaps, space, and more. This is why the browser takes a long time to load a site. Minification of these codes helps you make your website lighter by removing and minifying unnecessary scripts, codes, gaps, spaces, and more which results in faster loading of the website.
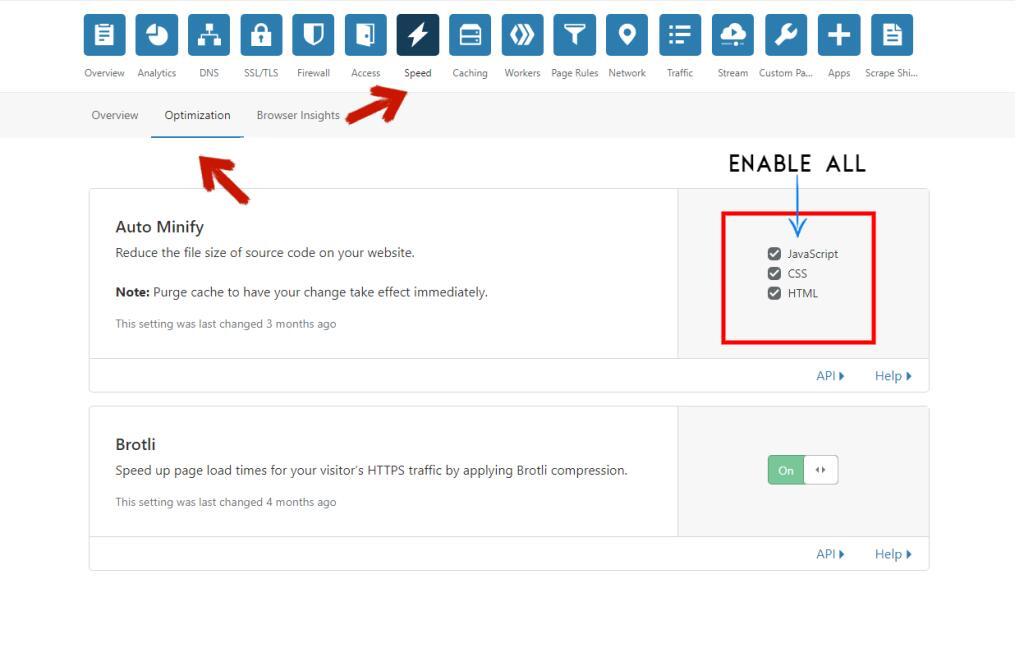
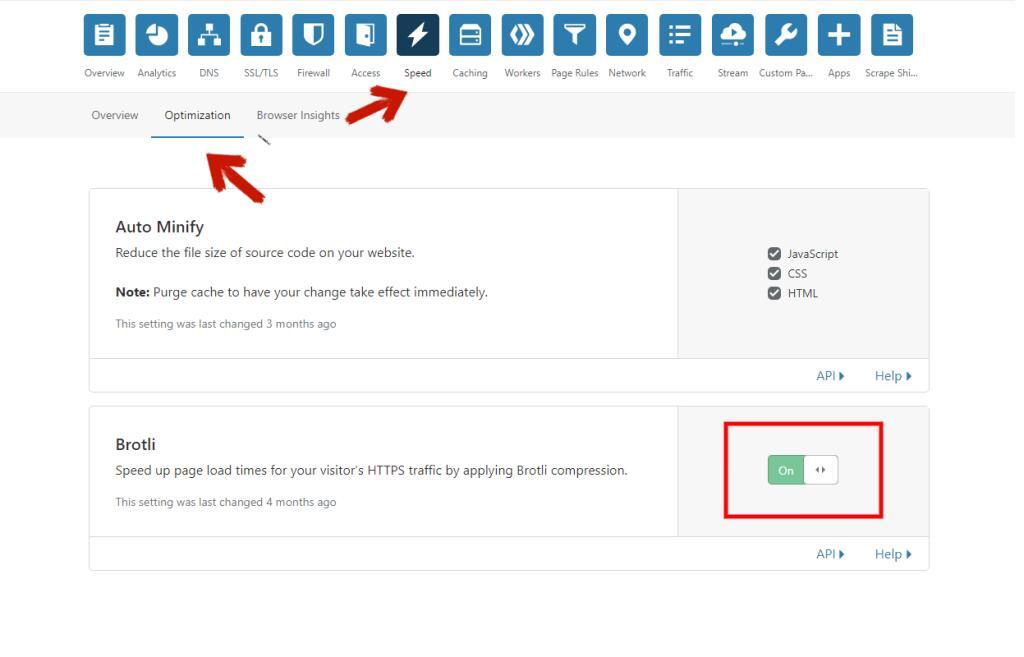
Login to Cloudflare Dashboard and head to Speed Tab >> Optimization to minify HTML, CSS, and JS files automatically.
Enable Compression
Enable GZIP Compression manually
If you are planning to use Cloudflare, don’t use GZIP Compression because CloudFlare provides a better lossless data compression better than GZIP. Also do not overwrite or try using both compressions.
<IfModule mod_deflate.c>
# Compress HTML, CSS, JavaScript, Text, XML and fonts
AddOutputFilterByType DEFLATE application/javascript
AddOutputFilterByType DEFLATE application/rss+xml
AddOutputFilterByType DEFLATE application/vnd.ms-fontobject
AddOutputFilterByType DEFLATE application/x-font
AddOutputFilterByType DEFLATE application/x-font-opentype
AddOutputFilterByType DEFLATE application/x-font-otf
AddOutputFilterByType DEFLATE application/x-font-truetype
AddOutputFilterByType DEFLATE application/x-font-ttf
AddOutputFilterByType DEFLATE application/x-javascript
AddOutputFilterByType DEFLATE application/xhtml+xml
AddOutputFilterByType DEFLATE application/xml
AddOutputFilterByType DEFLATE font/opentype
AddOutputFilterByType DEFLATE font/otf
AddOutputFilterByType DEFLATE font/ttf
AddOutputFilterByType DEFLATE image/svg+xml
AddOutputFilterByType DEFLATE image/x-icon
AddOutputFilterByType DEFLATE text/css
AddOutputFilterByType DEFLATE text/html
AddOutputFilterByType DEFLATE text/javascript
AddOutputFilterByType DEFLATE text/plain
AddOutputFilterByType DEFLATE text/xml
</IfModule>
Enable Brotli Compression with CloudFlare
Brotli compression is an open-source, generic-purpose lossless data compression algorithm developed by Google. Brotli compression is significantly faster than other types of compression algorithms developed and tested by Google. Brotli is also better at compressing data than Gzip, the popular compression algorithm used by most web servers.
You can enable Brotli Compression on your WordPress site easily with Cloudflare. Log in to your Cloudflare dashboard, head to Speed Tab >> Optimization, and scroll down to find Brotli under File Size Optimization, and simply enable it.
You are advised not to use GZIP and Brotli at the same time. This may bring complications or result in site loading non-readable texts.
Set Leverage Browser Caching – Add Expire Headers
Leverage Browser Caching tells the visitor’s browsers to remember some of your website resources. With this, the browser will cache files like (Images, CSS / JS, and other assets) and will only get expired after the period specified. To tell the browser to do this, you need to add the following rules to your .htaccess file.
# BEGIN Expire headers
<ifModule mod_expires.c>
ExpiresActive On
ExpiresDefault "access plus 5 seconds"
ExpiresByType image/x-icon "access plus 604800 seconds"
ExpiresByType image/jpeg "access plus 604800 seconds"
ExpiresByType image/png "access plus 604800 seconds"
ExpiresByType image/gif "access plus 604800 seconds"
ExpiresByType application/x-shockwave-flash "access plus 604800 seconds"
ExpiresByType text/css "access plus 604800 seconds"
ExpiresByType text/javascript "access plus 604800 seconds"
ExpiresByType application/javascript "access plus 604800 seconds"
ExpiresByType application/x-javascript "access plus 604800 seconds"
ExpiresByType font/truetype "access plus 604800 seconds"
ExpiresByType font/opentype "access plus 604800 seconds"
ExpiresByType application/x-font-woff "access plus 604800 seconds"
ExpiresByType image/svg+xml "access plus 604800 seconds"
ExpiresByType application/vnd.ms-fontobject "access plus 604800 seconds"
ExpiresByType text/html "access plus 600 seconds"
ExpiresByType application/xhtml+xml "access plus 600 seconds"
</ifModule>
# END Expire headers
You don’t have to add these if you already use optimization plugins such as WP Rocket, LS Cache, WP Fastest Cache, or other similar.
Optimize Images
Images can play an important role in slowing down your pages. Optimizing images comes under one of the things you want to consider while improving your load time.
Optimizing new images will become easier but what if you want to optimize your existing images and there are thousands of them? If I were you, I would simply automate the process. If you want to compress your images without converting or whatsoever, you can add the following filter to your active theme’s functions.php
add_filter( 'jpeg_quality', optimize_images('', 'return 50;' ) );After this, you need to regenerate the thumbnails. For this, you can use a plugin named Regenerate Thumbnails. This will allow you to regenerate all thumbnail sizes for one or more images that have been uploaded to your Media Library.
Till now, you must’ve analyzed your site via Google PageSpeed Insights. If you’ve gone through the Opportunities section, you must have probably seen the Opportunity “Serve images in next-gen formats”. Considering that suggestion, we will be optimizing our images in the next-gen format. If you don’t know what WebP is, you might want to know that images in next-gen formats often provide better compression than PNG or JPEG. If you want to serve images in the next-gen format, you should convert all the images to WebP. If you don’t know what WebP is, then well WebP is that next-generation format.
There are numerous plugins that will help you convert all your images (existing and ones you’ll upload later) into WebP format which will compress your images automatically. We cannot discuss all the plugins that can do this here but Imagify, WebP Express, ShortPixel are some plugins that you might want to try.
After converting images into WebP, you also have to serve images in WebP which can be done via a .htaccess rule or using a picture tag. Plugins suggested above also help you serve images in WebP, if it doesn’t you might want to consider this article on serving images in WebP in WordPress. There is a detailed guide on this topic. If you use WP Rocket or LS Cache, you can easily serve images via WebP. In WP Rocket, simply head to Settings >> WP Rocket >> Media >> Enable WebP Caching
Lazy Load Images
Lazy Loading Images is a set of techniques that defer the loading of images on a page to a later point in time. These techniques help in improving performance, better utilization of the device’s resources, and reducing associated costs.
Newspaper theme comes inbuilt with the Lazy Loading feature. Enabling lazy loading will reduce the number of requests, decreases bandwidth cost and resources. You can enable Lazy Loading in Newspaper theme via Newspaper >> Template Settings >> Image Loading – animations >> Use Loading Animation Images
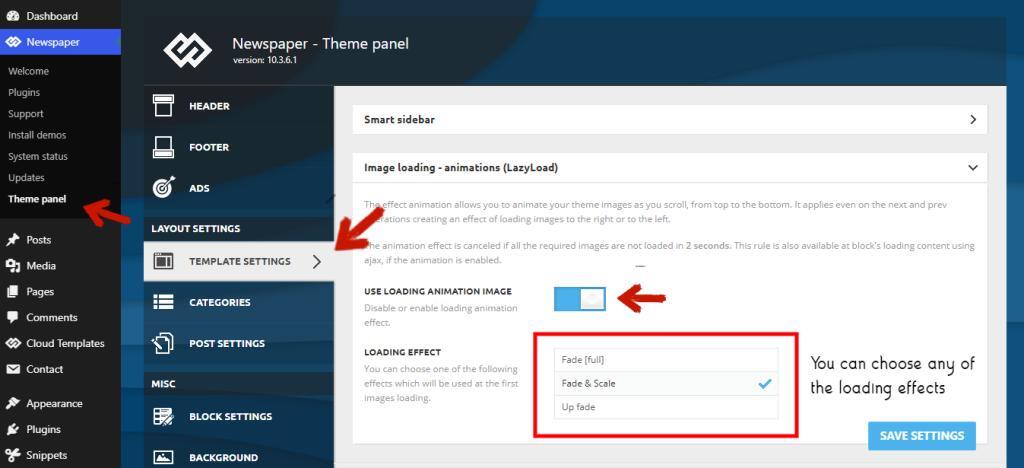
The only problem with Newspaper theme’s lazy loading is that we cannot automatically exclude above fold images from lazy loading. This can affect the Cumulative Layout Shift. You can lazy load images above the fold if you give height and width.
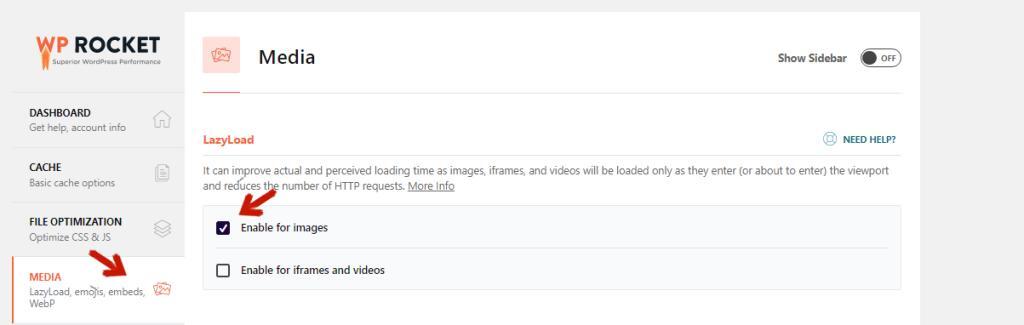
Another problem with the Newspaper theme’s lazy loading feature is that it cannot defer or lazy load background images (Images you add via CSS). What does it affect? Well if you run your website and test it in PageSpeed Insights, you’ll see an error (say Opportunity) that says Defer offscreen Images. This can be fixed by using WP Rocket’s lazy loading feature. If you want to enable lazy loading via WP Rocket, head to WP Rocket >> Media >> LazyLoad >> Enable for images
Note:- Don’t enable LazyLoading on both Theme Panel and any other optimization plugin (WP Rocket, LSCache, etc). If you enable both, some conflicts may occur which might break your images and stop it from loading.
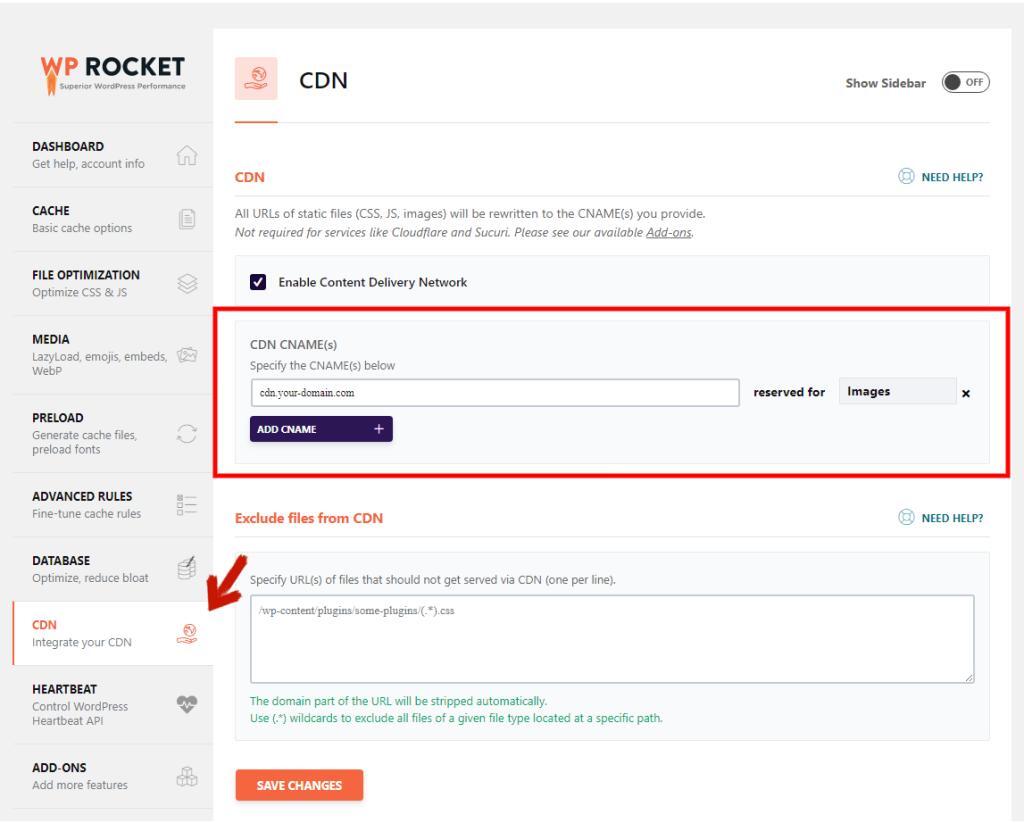
Use Image CDN
Using a CDN to optimize and serve images via CDN will help you unload stress from your head. After using an image CDN, we do not have to use any plugins or do anything. Everything will be automated and images will also be served in next-gen format (WebP). There are a few free image CDN that you can try. We here at xTechKR, are also using free CDN by CloudImage. It has all the features that a premium CDN provides. Do you why CloudImage is one of the best image CDN? Its free plan provides you the following features:
- 25 GB Image Cache
- 25 GB / month CDN Traffic
- 95% Uptime
- Best effort Support
You might want to enjoy all these features, give a try to
Serve Images via CDN
Using an image CDN will put all the load of processing and optimizing images on CDN’s cloud servers. This will decrease resource and bandwidth usage on your server as all the optimizations will be done by the CDN provider. Your images get a huge boost with better response time and global reach and also save a lot of money.
Serve your images at a much smaller file size with the WebP image format. The advantage of using an image CDN is that CDN will automatically serve WebP images to compatible browsers and optimized original non WebP images to in-compatible browsers through image CDN.
Disable Emojis
With the release of WordPress 4.2, developers added support for emojis into the core. The issue with this is that it adds an additional request on every page on your site by loading the wp-emoji-release.min.js file You can simply disable/remove emojis with code. Simply add the following to your active WordPress theme’s functions.php file.
// Disable Emojis
function disable_emojis() {
remove_action( 'wp_head', 'print_emoji_detection_script', 7 );
remove_action( 'admin_print_scripts', 'print_emoji_detection_script' );
remove_action( 'wp_print_styles', 'print_emoji_styles' );
remove_action( 'admin_print_styles', 'print_emoji_styles' );
remove_filter( 'the_content_feed', 'wp_staticize_emoji' );
remove_filter( 'comment_text_rss', 'wp_staticize_emoji' );
remove_filter( 'wp_mail', 'wp_staticize_emoji_for_email' );
add_filter( 'tiny_mce_plugins', 'disable_emojis_tinymce' );
add_filter( 'wp_resource_hints', 'disable_emojis_remove_dns_prefetch', 10, 2 );
}
add_action( 'init', 'disable_emojis' );
You don’t have to add this code if you are using WP Rocket, LS Cache, or any other plugin that has this feature. You can remove Emojis with WP Rocket, just head to Settings >> WP Rocket >> Media >> Emoji >> Disable Emoji
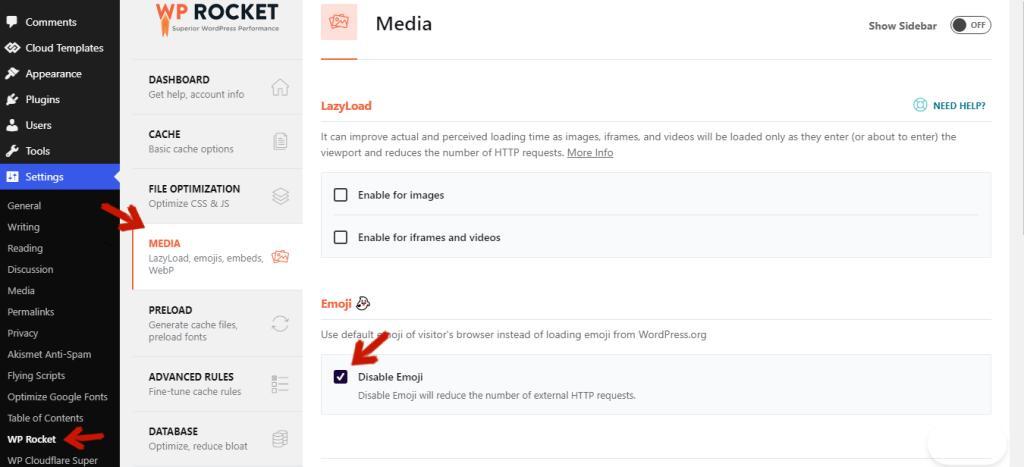
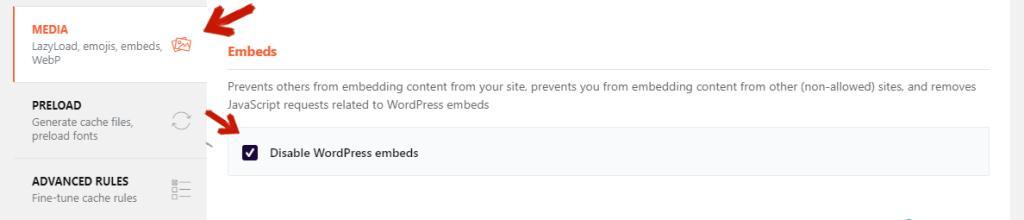
Disable WordPress Embeds
WordPress oEmbed recognizes URLs to a number of services, for example, YouTube videos. When WordPress sees the URL it will connect to the external service (Youtube) and ask for the relevant HTML code to embed the video into the page or post. Removing this will reduce an extra HTTP request. Newspaper theme comes with an inbuilt Embed script, which means there is no need to use embed script from core WordPress. Add the following code to your theme’s functions.php to de-register the Embed script.
// Remove WP embed script
function my_deregister_scripts(){
wp_dequeue_script( 'wp-embed' );
}
add_action( 'wp_footer', 'my_deregister_scripts' );
Disable WordPress Embeds with WP Rocket from Settings >> WP Rocket >> Media >> Embeds >> Disable WordPress embeds
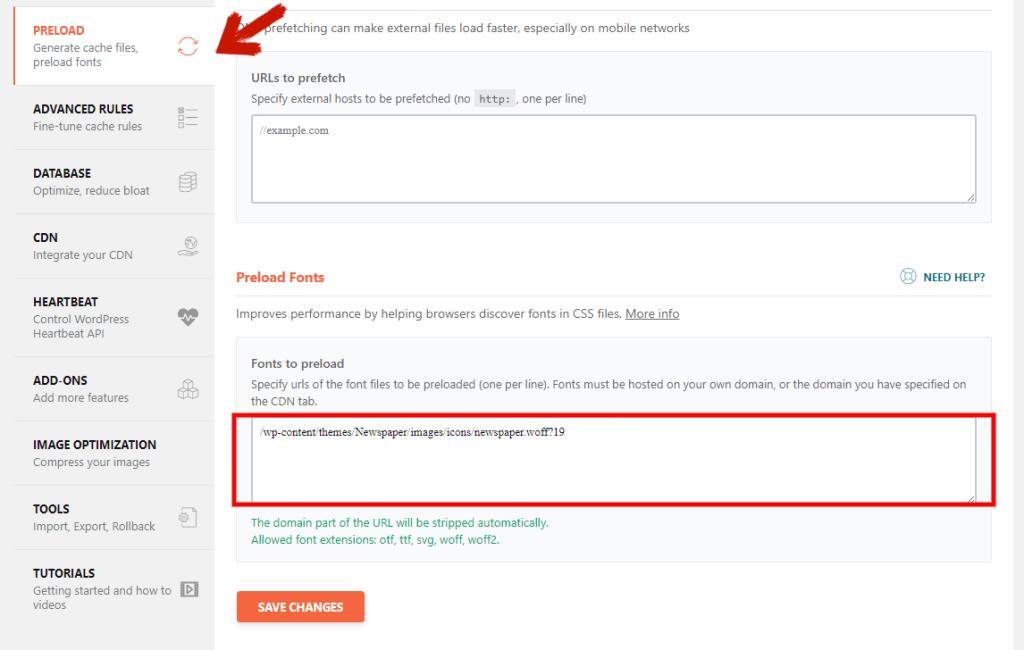
Preload Newspaper fonts
Preloading key requests will prioritize fetching resources that are currently requested later in page load. Preloading fonts will load them faster on your website. Add the following code to your active theme’s functions.php file.
Note:- Before adding the code, make sure you replace www.domain-name.com with your actual domain URL. Also, check the query string after newspaper.woff as it may differ from Newspaper Theme’s version to version. Here in this URL, https://www.domain-name.com/wp-content/themes/Newspaper/images/icons/newspaper.woff?19 the query string ?19 will differ from your Newspaper theme version. So make sure you check this before preloading the font if not a 404 file will get preloaded.
// Preload Newspaper font
function dns_prefetch_responsive() {
echo "<link href='https://www.your-domain.com/wp-content/themes/Newspaper/images/icons/newspaper.woff?19' rel='preload' as='font' type='font/woff' crossorigin>";
}
add_action( 'wp_head', 'dns_prefetch_responsive', 0 );
If you use WP Rocket then you can preload these fonts from the Preload tab. Add the fonts URL “/wp-content/themes/Newspaper/images/icons/newspaper.woff?19” to Fonts to be preloaded tab under WP Rocket >> Preload >> Preload Fonts
Delay scripts until user interaction
JavaScript is very resource-heavy. By delaying the execution of non-critical JavaScript (that are not needed for the initial render), you’re prioritizing and giving more resources to critical JavaScript files. This way you will reduce render time, Time to Interactive, first CPU idle, max Potential Input Delay, etc. This will also reduce the initial payload to browsers by reducing the number of requests.
Any script that is not crucial for rendering the first view or above fold contents can be delayed. Third-party scripts like tracking scripts, chat plugins, etc are ideal.
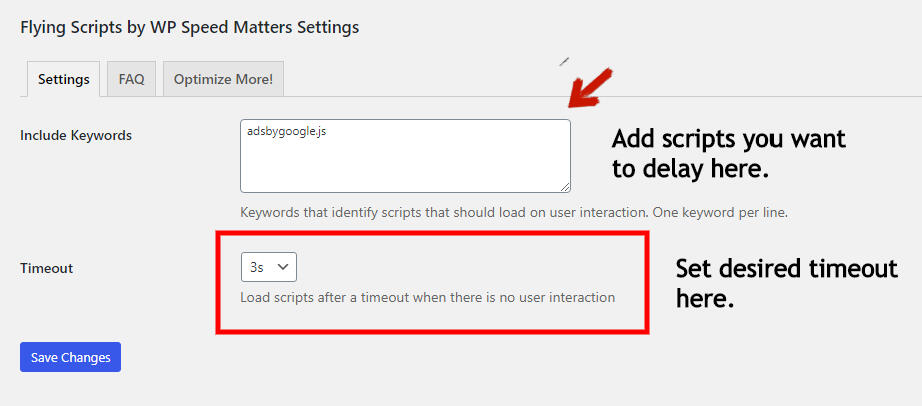
You can delay such scripts with the help of a plugin named Flying Scripts.
Flying Scripts start listening for events (Like mouse movements, scroll, etc.) at the end of HTML. So any script added by Flying Script is already ‘deferred’. Even if you add ‘defer’ to those scripts, it won’t make any difference.
What should I put in Include Keywords box?
Any keyword inside your inline script that uniquely identifies that script. For example “fbevents.js” for Facebook Pixel, “gtag” for Google Tag Manager, “customerchat.js” for the Facebook Customer Chat plugin.
Delay AdSense Ads
Google Adsense – Slows down the site a lot. If I had to put AdSense Ads, I would place them below the ‘Above fold’ and lazy load them. This way it will not affect FCP or FID. Of course. placing Ads below may result in lower earnings but since we’ve better FCP and FID, Google may eventually put us on top SERP. In the long run, it might end up in more earnings. You can easily delay AdSense Ads on your website with Flying Scripts. Just add the following line keyword in the Include Keywords box:
adsbygoogle.jsThere has always been a question where people asked if delaying AdSense script with Flying Scripts will decrease revenue?
Two to three seconds is the perfect sweet spot for delaying the AdSense script. We have heard from users using Flying Scripts that they have been using the plugin for quite a time and there is not a negative impact on their revenues.
Delay other scripts
Flying Script is more meant for 3rd party scripts. It is not recommended to delay any script from your theme or page builder. Every script will not be compatible with such a delay. It’s more meant for 3rd party scripts which are not critical for the initial render. You can delay OneSignal, Crisp Chat, and other scripts.
Note: Any script that is delayed using Flying Scripts shouldn’t be combined. You can combine other JS files.
Optimize fonts on your website
Fonts make the difference between a dull website and a beautiful one but don’t overload your pages with many fonts. Fonts need a high priority while optimizing since the text is probably the first thing a user sees on a website.
Limit Font Families
Using fewer fonts adds fewer HTTP requests. We suggest using not more than 3 fonts for your website. And also if possible, we suggest limiting the number of font weights too. Font weights start from 100 to 900, including each weight will result in an additional font being downloaded.
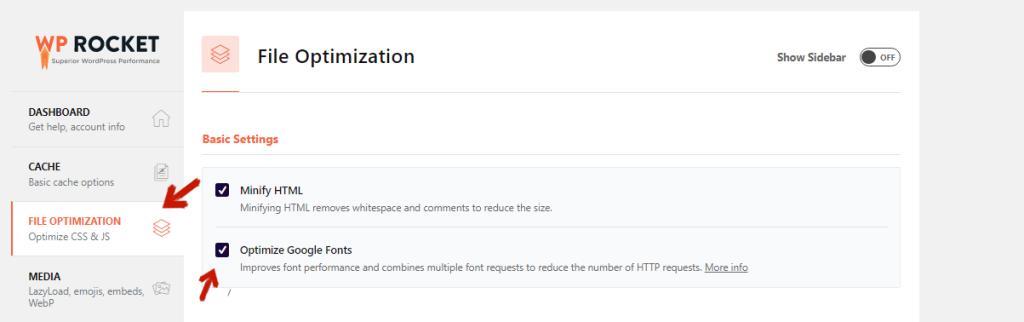
Combine Google Fonts
Combined Google Fonts will reduce HTTP requests. Combining Google Fonts won’t bring a huge difference in performance with HTTP/2 but it is a good practice. WP Rocket does this automatically for you. You can enable this by enabling Optimize Google Fonts options by WP Rocket >> File Optimizations >> Optimize Google Fonts and it will take care of this optimization.
Make sure all texts remain visible during Webfont loads
Leverage the font-display CSS feature to ensure text is visible to the user while web fonts are loading. It tells whether to show a fallback font while loading the font or make the font completely invisible. Adding “&display=swap” at the end of the fonts URL fixes this problem.
<link href="https://fonts.googleapis.com/css?family=Montserrat:600" rel="stylesheet">WP Rocket fixes this automatically by adding &display=swap at the end of the URL. You can enable this by enabling Optimize Google Fonts options by WP Rocket >> File Optimizations >> Optimize Google Fonts
Self-host Google Fonts
Google Fonts – Better to self host them.
We will be using OMGF for speeding this process. It is a handy plugin that will help you download Google Fonts, generate stylesheets for it and auto remove Google Fonts requests. It also has few more features but we will not talk about those here. Install this plugin as you do with any other while installing them from the WordPress repository. After you’ve successfully installed and activated it, go to Settings >> Optimize Google Fonts
Download Google Fonts
You can start by searching for your required Google Fonts or automatically by pressing on Auto Detect. If you want the plugin to check all the fonts that you currently have, simply click on Auto Detect. After this, you want to load any of your pages so that OMGF can recognize what fonts you are using.
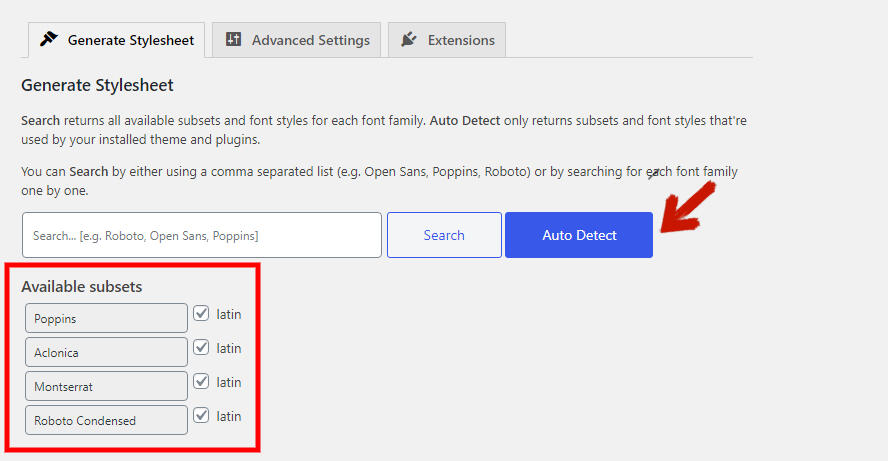
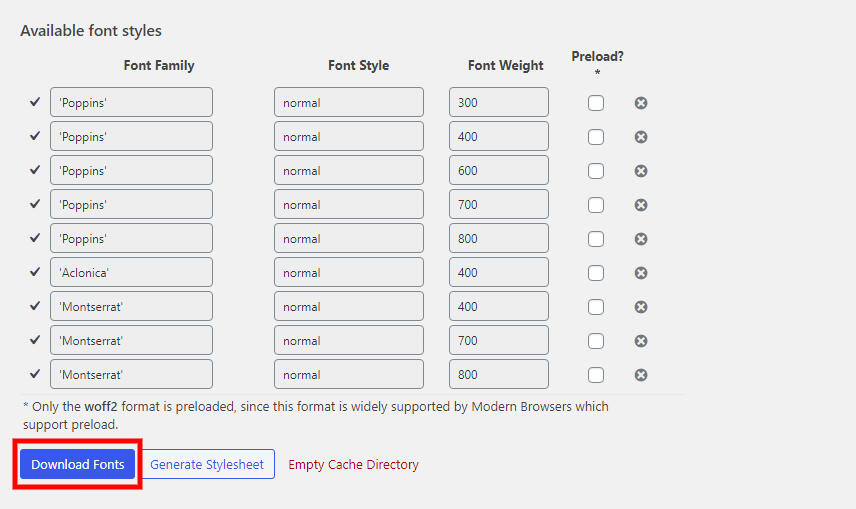
You’ll then see all the available fonts. Remove the unwanted variations of the font and press Download Fonts to download the fonts to your server.
Generate stylesheet for fonts
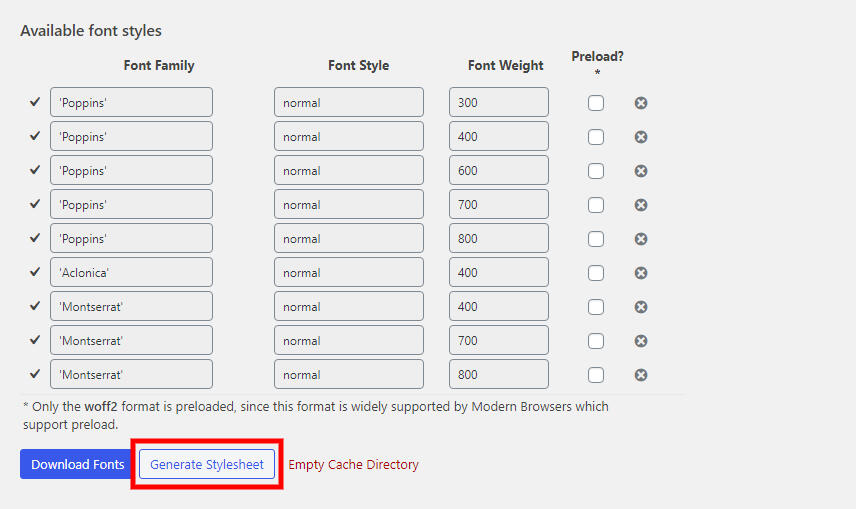
You don’t have to do anything to create a stylesheet for the fonts you just downloaded. Simply press Generate Stylesheet and the stylesheet will be automatically created and added to the head of your pages and use those Google Fonts straight from your server.
Remove Google Fonts requests
There are few ways to remove Google Fonts and API requests from your theme (Those known to me). But we will use the feature provided by the plugin to get the job done. Under Advanced Settings of OMGF plugin, you’ll see an Auto Remove button, simply tick that and Save Changes.

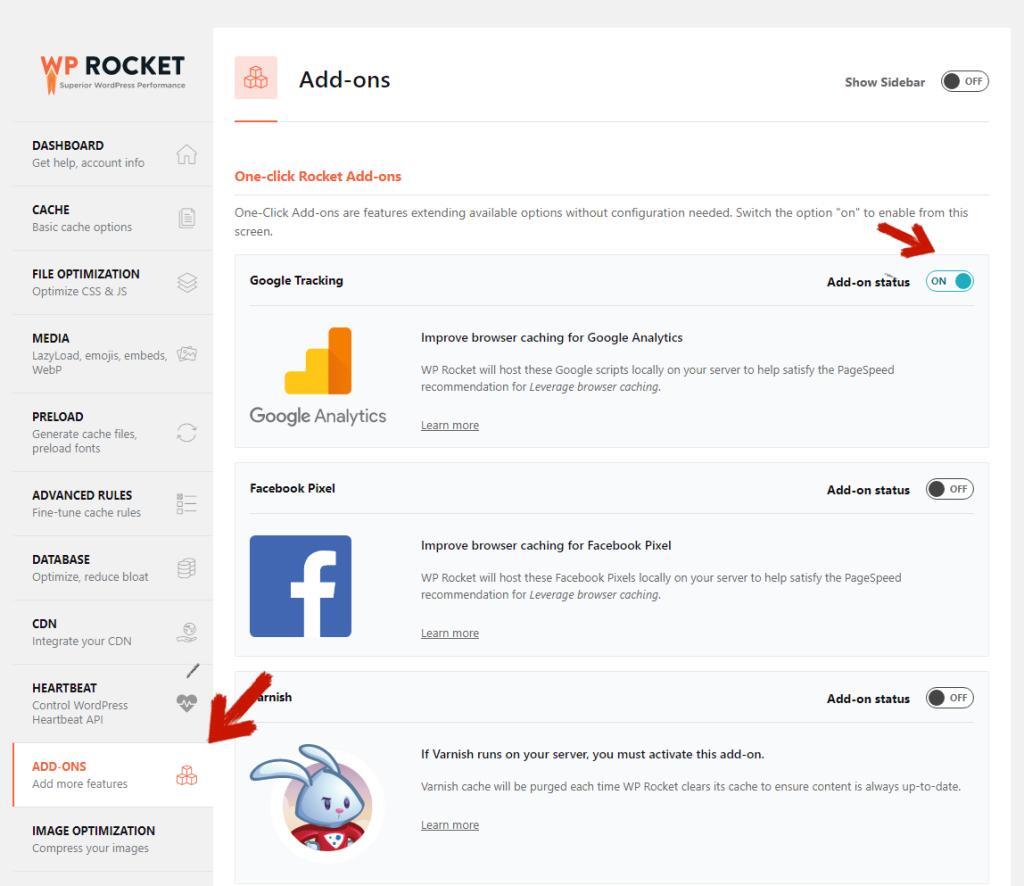
Self-host Google Analytics
Improve browser caching for Google Analytics. You can use WP Rocket to self-host Google Analytics. Go to WP Rocket >> ADD-ONS >> Google Tracking and turn the Add-on status to ON
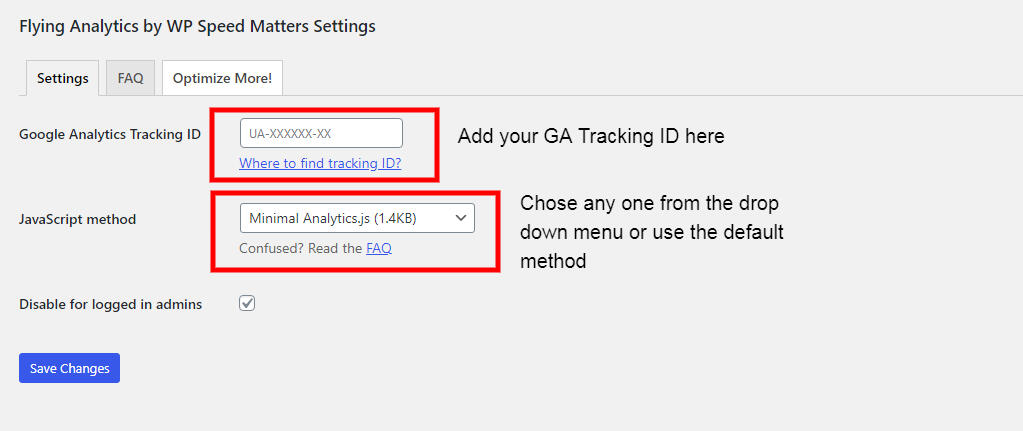
If you don’t have WP Rocket, you can host Google Analytics locally with the help of a free plugin called Flying Analytics
With the plugin installed and activated, go to Settings >> Flying Analytics, add your Google Analytics Tracking ID, choose your required JavaScript Method, and Save the changes. If you get confused with the JavaScript Method selection, head over to the FAQ section in the plugin. you’ll find all the answers to your question.
Host jQuery from Google
Using Google Library CDN for jQuery will definitely serve you a great purpose in terms of performance and such. Serving jQuery from Google will help you get better performance as Google has a better server than yours (obviously). jQuery is loaded from the closest Google server and will result in less load on your server.
// Load jQuery from Google Library
function replace_jquery() {
if (!is_admin()) {
// Comment out the next two lines if you want to load local copy of jQuery (Not Required though)
wp_deregister_script('jquery');
wp_register_script('jquery', 'https://ajax.googleapis.com/ajax/libs/jquery/2.2.4/jquery.min.js', false, '2.2.4');
wp_enqueue_script('jquery');
}
}
add_action('init', 'replace_jquery');
Before adding the above code to your theme’s functions.php, review this URL ‘https://ajax.googleapis.com/ajax/libs/jquery/2.2.4/jquery.min.js’, false, ‘2.2.4’
jQuery v2.2.4 worked for me as I am using the latest Newspaper theme and I saw no conflict or compatibility issues with other plugins with it. But you shall change it to 1.12.4 or lower according to your need. If you are on an older version of Newspaper this might break things. Also, all plugins might not be compatible with jQuery v 2.2.4
Plugin Load Optimization (Clean unnecessary Assets)
Remove comment-reply.min.js
We don’t use a comment box on all pages. I only want users to comment on posts and not pages. So, we can remove the comment-reply.min.js file from all pages and not from posts. We can achieve that by adding a simple code to the themes functions.php file.
// Remove comment-reply.min.js
add_action( 'wp_enqueue_scripts', 'comment_reply_hook' );
function comment_reply_hook() {
if ( !is_single()) {
wp_deregister_script( 'comment-reply' );
}
}
Also, there can be some cases where we might be using a third-party comment system such as Disqus. In such cases, there is no need of loading the comment-reply.min.js file even on posts. You can remove it from all pages. You can simply remove the file by adding the following code to the functions.php file:
// Remove comment-reply.min.js
add_action( 'wp_enqueue_scripts', 'comment_reply_hook' );
function comment_reply_hook() {
wp_deregister_script( 'comment-reply' );
}
In my case, I am not using any third-party comment system and am using the comment system that WordPress provides by default. And for reason, removing comment-reply.min.js from all pages including posts didn’t break anything (might be due to TD Cloud Library). This might not be the same case for you. So try adding both codes one by one and see which one suits your needs.
Remove underscore.min.js
While I was trying to optimize my WordPress site, I came across this script underscore.min.js. I found it unnecessary to load it in the front-end if you don’t use the Article Auto Loading feature in Newspaper.
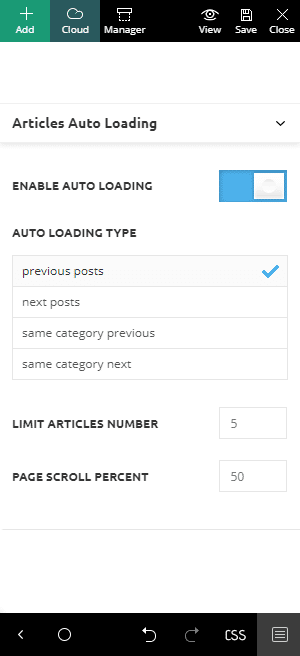
You might be using this feature on your posts where you automatically load the next article whenever the user comes to the end or near the end of the article. underscore.min.js is required if you use this else you can remove this.
This script is needed in the WordPress backend while editing pages visually using TD Composer, else no changes will be reflected after doing some changes visually. You need to save the page and reload it to see the changes.
// Remove underscore.min.js on all pages excepts posts
add_action( 'wp_enqueue_scripts', 'my_deregister_javascript' );
function my_deregister_javascript() {
if ( !is_single() && !is_user_logged_in()) {
wp_deregister_script( 'underscore' );
}
}
Assuming you don’t use the AutoLoad feature on pages (Home Page and other), the above code will do the job without any problem. If in case you use Auto Load on Homepage or any other pages, you can add the is_page() function to load underscore.min.js on those pages. The above code will not remove the underscore.min.js file if the user is logged in. This is necessary because you need it while editing pages with TD Composer.
If you don’t use the Article Auto Load feature on posts too and want to remove underscore.min.js from all pages, add the following code to the functions.php file.
// Remove underscore.min.js for not-logged users only
add_action( 'wp_enqueue_scripts', 'my_deregister_javascript' );
function my_deregister_javascript() {
if ( !is_user_logged_in()) {
wp_deregister_script( 'underscore' );
}
}
Remove dashicons.min.css on frontend
Dashicon is the official font icon of WordPress Dashboard from v3.8. We don’t need to load dashicon.min.css for non-logged users as it will add one unnecessary HTTP request to the front-end.
You can stop loading dashicon.min.css on the front-end of your site by adding the following code to the functions.php file of your active theme.
function wpdocs_dequeue_dashicon() {
if (current_user_can( 'update_core' )) {
return;
}
wp_deregister_style('dashicons');
}
add_action( 'wp_enqueue_scripts', 'wpdocs_dequeue_dashicon' );
The above code will not affect the backend because of the if statement. WordPress Admin Dashboard uses dash icons so the above code will remove the dash icons for non-logged users only and not for the users who are logged in.
Stop Gutenberg Block Library CSS from loading on the frontend
A new WordPress editor (Gutenberg) was included in WordPress 5.0. Many users found it difficult to use is as they were used to the classic editor. The Gutenberg WordPress editor is a page builder that is being designed to integrate with the WordPress core and provided multiple functionalities. We suggest you at least start using the Gutenberg editor as it will be the future for editing.
Gutenberg adds 83KB CSS on every page. We can remove them if we don’t use Gutenberg. There can be a different case scenarios for different users. For example, we use the Gutenberg editor only for posts. Some users might not be using the Gutenberg editor at all.
If you are a non-Gutenberg user, add the following code to your themes functions.php file to remove its CSS from everywhere.
// Stop Gutenberg Block Library CSS from loading on frontend
function smartwp_remove_wp_block_library_css(){
wp_dequeue_style( 'wp-block-library' );
wp_dequeue_style( 'wp-block-library-theme' );
wp_dequeue_style( 'wc-block-style' ); // Remove WooCommerce block CSS
}
add_action( 'wp_enqueue_scripts', 'smartwp_remove_wp_block_library_css', 100 );
If you are a user like us, who uses Gutenberg editor for posts only, we don’t need Gutenberg Block CSS Library to load on pages like Homepage and others. If this is the same case with you then add the following code to your active themes functions.php file.
// Stop Gutenberg Block Library CSS from loading on every pages except posts
add_action( 'wp_enqueue_scripts', 'my_deregister_stylesheet' );
function my_deregister_stylesheet() {
if ( !is_single() && !is_user_logged_in()) {
wp_deregister_style( 'wp-block-library' );
wp_deregister_style( 'wp-block-library-theme' );
wp_deregister_style( 'wc-block-style' ); // Remove WooCommerce block CSS
}
}
What the above code does is deregisters the Gutenberg Block Library CSS from all pages except posts. Also, the above code will not remove the CSS if the user is logged in.
Stop loading Contact From 7 files everywhere.
Contact Form 7 is a free contact form plugin available in the WordPress repository. Despite being a popular and lightweight contact form plugin with 5 Million+ active installations, it loads on all pages by default. Though these files may be small, it is a good idea to remove them, why should you load them if it is not at all required on pages that don’t have a Contact Form? It will unnecessarily increase HTTP requests which is not something we want.
Add the following code to the themes functions.php file.
/**
* Contact Form 7 - Load files only if necessary
*/
if (!function_exists('rc_dequeue_scripts_styles')) {
function rc_dequeue_scripts_styles() {
if ( WPCF7_LOAD_JS && WPCF7_LOAD_CSS ) {
global $post;
if ( !strpos($post->post_content, '[contact-form-7') ) {
wp_dequeue_script('contact-form-7');
wp_dequeue_style('contact-form-7');
}
}
}
add_action( 'wp_enqueue_scripts', 'rc_dequeue_scripts_styles' );
}
This code has a function rc_dequeue_scripts_styles which checks if a page contains CF7 shortcode. If there are no CF7 shortcodes on the page, then it will dequeue CF7 JS and CSS. You don’t have to manually add pages ID or name where you want CF7 to load, it will do the work automatically.
Conclusion
This might be a long read for all. If you are reading this then you must have known by now how important optimization is and how it is done. And BTW, do you remember we asked you to save a report of your site’s performance at the beginning of the article? Now we want you to perform a new test and compare the results. We bet you will feel proud after seeing the result. If you get some unexpected results or get stuck in anything, we are always ready to help you. This is how it ends.


![WI-FI Names [Cool & Funny]](https://cdn.xtechkr.com/wp-content/uploads/Best-Wi-Fi-Names-Collection-Featured-100x100.png)

Thank You for your instructions. It was useful.
I have a doubt.
Regarding WP Cloudflare Super Page Cache plugin, The plugin has a separate cache for mobile? or single cache because if it doesn’t have a separate cache, then the mobile theme will load on the desktop version. I faced such a problem in APO while using an earlier time with NewsPaper Theme.
Thank You
Giri
WP Cloudflare Super Page Cache won’t work if you use the mobile theme from Newspaper. The reason is Cloudflare free plan doesn’t allow you to save separate caches for different viewport devices. So, the first HTML that gets cached on Cloudflare is what will be shown to all devices. You need to be on a higher plan to serve a different version of the page on different viewports. Perhaps APO could do the trick but I’m not sure.
Hi,
This is a super helpful piece of article. Thank You:)
I followed all the tips that you mentioned and my site’s performance improved a lot (80+ on Mobile and 95+ on Desktop). The only thing that I haven’t done yet is converting images to WEBP… I wanna install the WebP express plugin to compress and covert all the images but I found out it’s not compatible with my Cloudflare free plan. They say Cloudflare CDN won’t support WebP as a cache key. Is there a solution for that? Could you help me to improve the last flaw that affects my site’s performance?
Yes, in the free plan, Cloudflare CDN won’t support WebP as a cache key but you can still serve WebP to supported browsers with Cloudflare. In the free plan, if you aren’t using the “Cache Everything” Page Rule, this shouldn’t be a problem. If a request comes from a supported browser, images will be served as WebP with .webp being appended at the end of every image URL, and if a request comes from a browser that doesn’t support WebP images, original images will be served.
Another solution, if you want to keep the “Cache Everything” Page Rule, use an image CDN. For instance, you can try Flying Images. They use Statically to provide free CDN. It also provides on-the-fly image compression and WebP conversion that should make a lot of your work easier.
This is the best tutorial that I found. I followed so many steps here and my site is loading faster now.
However the server response time is still low, and it’s hard to fix that because I need money to upgrade server resources.
Anyway, Thanks. This is really helpful.
Server response time usually depends on the server speed and the location where your website is hosted. Make sure you are testing your site from a location nearer to your hosting. So if your hosting is located in the US, make sure to run the PageSpeed Insights from the US. Use a VPN and change your location nearer to your hosting server (or the same country). If you still see the server response time still low, use a CDN. I prefer Quic.cloud CDN if looking for a free option. Quic.cloud will help you improve your TTFB by a lot as it caches your HTML and static files as well and serves that from their edge servers.
Hope that helps.
How to fix /wp-content/plugins/td-composer/legacy/Newspaper/js/tagdiv_theme.min.js
PSI tool calls it Unused JS. 53.3 KiB (transfer size ) 42.5 KiB(potential saving size ).
Any help would be appreciated.
Removing Unused JS is very hard. If you do it manually you might get your desired result but it’s a very tedious task. Is the JS blocking the initial render? If not I would not worry about it. I would suggest you delay all the JS that is not responsible for the initial render of the page.
How to use cache everything in Cloudflare. Newspaper theme has a separate theme for mobile and desktop? If we enable everything cache, it shows the mobile site on desktop and sometimes desktop theme on mobile. So it’s not good.
That’s a tough one. I haven’t tried it myself because I never liked the Mobile Theme. You cannot cache two versions of the same URL or it might be a challenging task to get this done if you are on the free plan. If you are on the Enterprise plan, you can set up Page Rules to separate your cached content based on the visitor’s device type: Mobile, Tablet, and Desktop. You might as well get your desired result by writing a custom worker. Since I have no experience in this, I am sorry to say I might not be of any help. You can easily achieve 75+ on mobile and 90+ on desktop easily without the mobile theme. If you need any kind of help, I am willing to offer you my help. Just drop your questions and I’ll guide you with every step.
Very helpful article, but should also be done the changes in the function.php in the mobile version too? Because I’m using the mobile Theme.
Greetings
You don’t! The mobile theme already loads the minimal styles and scripts. Any filters you add in the functions.php of the active theme or with Code Snippets works everywhere, even for the Newspaper theme’s Mobile Theme.